Learn how to recreate one of 2013’s hottest trends: affirmation accessories
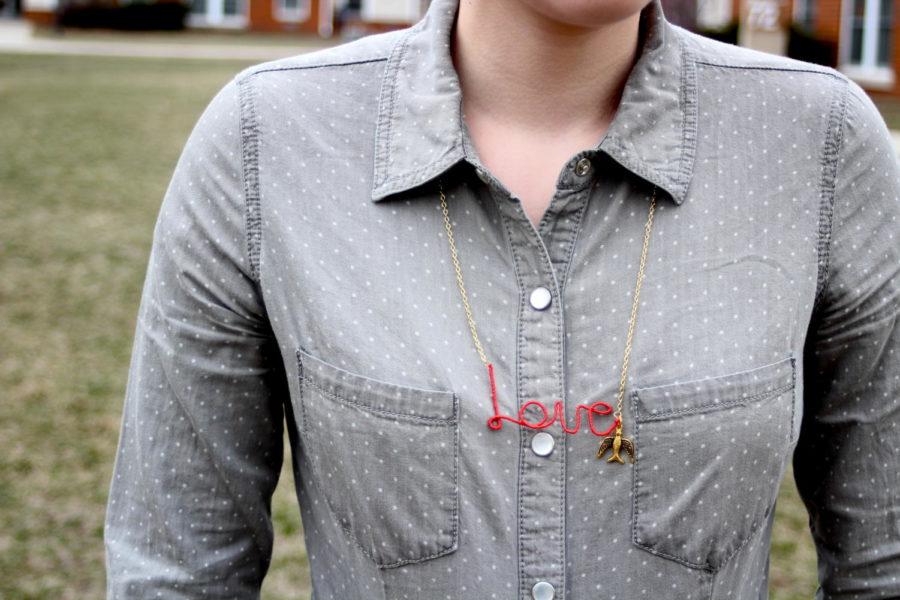
Do-It-Yourself Necklace
April 8, 2013
Springtime is finally upon us. We are more than ready to toss out our hoodies and boots and replace them with our beloved crop tops and cut-offs, but this spring is all about the accessories.
Keep an outfit simple with a low-back T-shirt paired with your favorite summer skirt and throw on a piece of statement jewelry to really hit the mark.
If you’re on a tight budget, we hear you. In our opinion, it’s not worth it to drop $30 on a necklace that took $2 to make, when we know very well that we’re capable of making a similar one ourselves.
We know what you’re thinking. You always find a super cool do-it-yourself on Pinterest and go into it with the highest hopes that your version will turn out looking like it came straight out of an Anthropologie catalog, when in reality, it looks a little more like an entry on a fail blog.
After your fifth major fail, you may be downtrodden and ready to give up. But don’t give up on us quite yet — we’ve found a super trendy, spring ready DIY necklace that is much easier to make than it looks.
Steps to make your own necklace:
- After cutting your wire to size, turn one end under with the pliers, making a small eyelet. Now, tie the embroidery thread up by the eyelet. Triple knot it, cutting off the loose end.
- Begin wrapping the thread very tightly around the wire, working your way away from the knot. Make sure to push the thread up as you go to ensure the rows are as close to each other as possible. You will continue this down the length of your wire until there is about 1/2 inch of wire remaining. Tie another few knots, cutting off the excess. Take the clear nail polish and dab a little on each knot for extra security. Let dry.
- Taking one end of the wrapped wire, position your pliers about one inch from the edge and bend the wire out to the left, making a backwards “L.” Then, take the wire you just bent to the side and loop it over the top, making a forward “L” with a small loop in the corner.
- Take the nail polish bottle and wrap the wire around the lid, making an “O.” This is just for a general shape. You can then mold your “O” to be the size you want, at the distance from the “L” that you desire. After making the “O,” angle the wire upward.
- Take the now-vertical wire near the height of the “O” and angle it sharply downward, using your pliers to pinch it closer. This is the beginning of your “V.” At the bottom of your “V,” shape the wire back upward, putting your pinky in the bottom curve to base the shape. At the place you want “V” to end, angle the wire out to the right side at slightly less than a 90-degree angle.
- Place your pliers about 1/2 inch from the end of the “V” and wrap the wire upward, down and around to create your “E.” Shape the “E” to your liking, angling the tail of it upward. You may have to play around with this a few times to ensure proper spacing and sizing.
- At the end of wire you just completed, attach your charm at one end of your chain. Use your pliers to close the wire into an eyelet, just as you did on the opposite end. Attach the other end of the chain to the eyelet at the top of your “L.” Make sure to close it tightly with the pliers.
- Rock your quirky and cute new accessory and be prepared for a handful of compliments.
Go ahead, fellow fashionistas: Craft away. Don’t say we didn’t warn you how simple this was.