
How to: Arm knit an infinity scarf
Step eight: Continue this procedure of alternating all 12 loops from right arm to left arm 30 times.To check your progress, flip over the scarf and count the lines that are made from the rows of links. This will measure how many times you have transferred the yarn loops.Step nine: To finish the scarf, put two loops around one arm and pull the loop closer to the body over the farther one.Then pull an additional loop over from the other arm so there will be once again two loops on your finishing arm.Again, pull the loop closest to the body over the farther loop.Progress with this step until there is no more singular loops on the opposing arm.
February 4, 2014
Cold weather calls for bundling up in cozy infinity scarves. Here’s how to make one using an unlikely tool — your arms.
Step one: Line up the end pieces of each yarn bundle and create a tail by pulling four feet loose from the bundle.
Step two: At the four foot mark, create a slipknot with the two strings from the separate bundles still in tact.
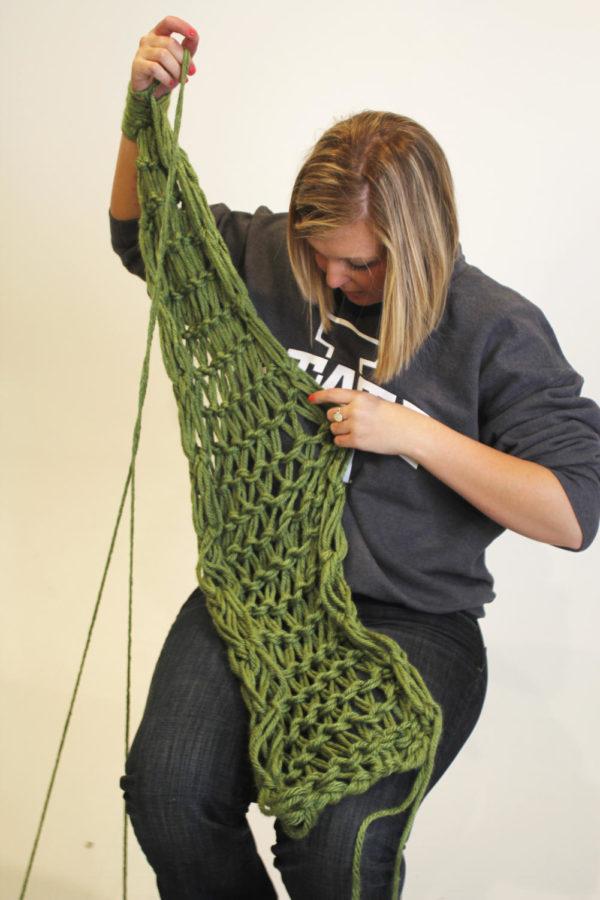
With this first loop, slide your right arm through the hole.
Push the hole or knot halfway up the right arm, making sure the loop is not too tight, which would constrain it from sliding up the arm.
Step three: Now separate the two strings, one named the tail and the other working yarn.
With your free hand, wrap your thumb around the working yarn towards the body to create another loop.
Take the index finger of the same hand and wrap around the tail string.
When left hand is held up, it should resemble a gun motion with the other three fingers holding down the string against the palm.
Step four: Next, take right hand and slide it up and under the thumb loop on the left hand.
With the right hand now looped through the thumb loop and raised above the left hand, slide back down under the index hole again and continue moving back through the thumb loop again.
Step five: Repeat step four 12 times so there is eventually 12 knots along the arm.
At this point, the tail is no longer in use.
Step six: Hold the working yarn in the hand with all the loops along the arm and make sure the working yarn is pointed out, away from the body with your thumb.
Grab the first loop on arm and pull it away from the body, over the fist, making a loop with yarn holding and put right hand through now created hole and tug to tighten.
Step seven: Repeat this process until all loops are on the opposite arm than where they started.
Step eight: Continue this procedure of alternating all twelve loops from right arm to left arm 30 times.
To check your progress, flip over the scarf and count the lines that are made from the rows of links. This will measure how many times you have transferred the yarn loops.
Step nine: To finish the scarf, put two loops around one arm and pull the loop closer to the body over the farther one.
Then pull an additional loop over from the other arm so there will be once again two loops on your finishing arm.
Again, pull the loop closest to the body over the farther loop.
Progress with this step until there is no more singular loops on the opposing arm.
Step ten: Finally, take the end piece and intertwine them through each end of the scarf to connect one another.